Hunter Melee/Class Ability Loop

Hunter with Melee 48 | Class 67 can loop Gambler's Dodge → Combination Blow melee with no wait time (PvE). At 46|65 there's about 1 second wait, but using Soaring Dodge means melee recharges while landing. Without any other effects. #Destiny2

Arc Soul + Getaway Artist Combo

Arc Soul now counts as grenade, so with Getaway Artist, each Arc Soul hit triggers Prismatic fragment "Facet of Command" applying Jolt. #Destiny2

Armor 3.0 Management Guide

1/3

Proposal for Armor 3.0 management. Mainly PvE but includes minimal PvP. If your vault is overflowing and you don't know what to do, give this a try. My vault was at its limit so I researched and devised this method. #Destiny2

2/3

For more details, check out this slide deck. It explains what builds you can make with the armor you keep, what DIM commands to use to filter armor, and how to organize step by step.

3/3

The method I propose is based on the Paragon & Gunner approach from this video. Even if you end up with only Paragon on top and Gunner on bottom, you'd be in trouble if you dismantled everything else right away, so my proposal includes the process to get there and minimal PvP support.

Recuperation MOD Bug (2x = 75HP)

1/2

Recuperation MOD instant heal: 1 mod = only 15HP, but 2 mods = 75HP bug. Needs 2 but exceeds pre-nerf 70HP. With 100 Resilience + 2 Recuperation, one orb nearly full heals HP. Quite useful for survival builds. #Destiny2

2/2

The in-game description for "Better Already" says equipping multiple copies increases the effect, but that's false. The effect doesn't stack at all, so be careful.

Melee Build Stat Distribution

1/2

When building melee builds, focusing only on Melee 200 with Brawler armor means wasting stats on unpopular Resilience. Mix in Paragon (Super/Melee) to get Super 100+ with Hands-On and Heavy Handed for faster supers. More fun to play. #Destiny2

2/2

When progressing efficiently through solo Ops, there are cases where your Super isn't charged by the boss fight, so lowering Melee a bit and boosting Super might be just right. You could also just beat the boss with weapons and fists without relying on Super.

Weaken + Thundercrash Combo

1/3

Apply Void Weaken (15%) with Gaze of the Abyss before Thundercrash - easy to do, please spread this. Keep one Primary and one Special weapon with Gaze of the Abyss to avoid losing energy ammo on loadout swap. Last image shows all weapons with Gaze of the Abyss. #Destiny2

2/3

Fusion Rifles that need charging or GLs that are hard to hit at range aren't suited for this. For Special ammo, SR or Rocket Sidearm is better. Of course, works with Nighthawk or Nova Bomb too, not just Thundercrash.

3/3

The normal 15% Weaken lasts 6 seconds. Even if you can apply Weaken with abilities, it's better to start DPS with Gaze of the Abyss Weaken first, then add ability Weaken when it expires. You don't want to wait 1.5 seconds mid-DPS for Gaze of the Abyss.

Volt Charge + Le Monarque Combo

Smaller magazine = fewer hits needed for Volt Charge stacks. Le Monarque has mag size 1 and poison multi-hits, so Volt Charge fills rapidly with constant lightning strikes. #Destiny2

Facet of Solitude Bow Interactions

1/4

"Facet of Solitude" applies Sever on consecutive precision hits. Bows normally need 2 precision + 1 body for Sever, but: Enhanced Kinetic Tremors bow: 2 precision + tremors = Sever. Explosive Head: 2 precision + explosion = Sever. Trinity Ghoul: 3 arrows precision + body = Sever. Le Monarque: 2 precision + poison = Sever. Wish-Ender: 1 precision 2 body → 1 precision 2 body = Sever. #Destiny2

2/4

Hits to trigger "Facet of Solitude" Sever: Adaptive Burst LFR (details below) Mag 7+: head-head-head + head-head-body. Mag 6 or less: head-head-head + head-body. Mag 4 or less SR: 1 precision + body. Polaris Lance: 3 precision + body. Buried Bloodline: double precision x2 + body.

3/4

Compendium says as quoted, but Adaptive Burst LFR is different. For example, Mag 6 should be Floor(6*0.2)+1=2 hits to prepare Sever, then 3rd hit triggers it, but that's not happening. Probably bugs related to 1 ammo = 3 bolts mechanic.

4/4

Mag 5+ SR: 2 precision + 1 body for Sever. Enhanced Kinetic Tremors Supremacy is 2 precision + tremors explosion as quoted. Note: SR here means any precision weapon with same mag size, including (slug) SGs and LFRs.

Chill Clip + Hunter Dodge Freeze

1/3

Chill Clip Tincture applies 40 Slow, Hunter Slow dodge applies 60, so approach + one Chill Clip shot + dodge = freeze. This gives +120% damage (2.2x) to elites and below via Shatter. Also has AoE so can one-punch multiple adds. #Destiny2

2/3

The melee damage boost vs frozen enemies is useful to remember as a way to increase punch power beyond Liar's Handshake, Synthoceps, Stylish Executioner, etc. However, some melee abilities don't get this boost and deal Consecration-like damage. Someone tested all of them.

3/3

Linking for reference.

Knight Shield Counts as Shield

Knight one-hand shields count as "shields" so Warlord's Ruin origin trait "Extraction" triggers. Useful to know for Onslaught vs Hive. Also triggers: Barrier Breach, Origin traits, Adaptive Munitions, Retaliation, Under-Over, Rasputin's Arsenal. See quoted video for details. #Destiny2

Phoenix Protocol Mid-Super Swap

1/2

Phoenix Protocol works even if equipped after placing Well, so you can start Well cast with different build then swap to Phoenix Protocol mid-animation to charge next super. Orpheus Rig works same way - build up with Star-Eaters then swap to Orpheus during Deadfall cast. Busy but effective. #Destiny2

2/2

Both exotics cap super recovery at 50%, so once you've recovered enough, swap back to a different build while Well or Deadfall is still active for safety. But if you panic and mess up the loadout swap, it's probably better not to try this (self-reminder).

Desperate Measures Perk Analysis

1/3

New perk "Desperate Measures" vs Golden Tricorn: Can start from ability kill, activates even when not holding the weapon, effect persists in background when swapping weapons. Much easier to proc. No weapon swap restriction is quite comfortable. #Destiny2

2/3

Desperate Measures is x1|2|3 = +10|20|30% damage, all states last 7 seconds extended by weapon/grenade/melee ability kills. Golden Tricorn is weapon kill for x1/+15%/7s, then **same element** grenade/melee ability kill for x2/+50%/10s. At x2, weapon kills no longer extend duration.

3/3

Desperate Measures: if you start with 1 enemy ability kill going x0→x2, you need another ability kill to reach x3. However, weapon kills can extend the timer at x2. If your starting ability kill gets 2+ enemies, you can go straight to x3 as shown in the video.

Mountaintop Blast Radius Math

1/5

Mountaintop deals more total damage with lower blast radius. Hard Launch(HL)+Spike ≒ HL+Implosion > Implosion > Spike. HL+Spike/Implosion gives 12.7% total damage increase over base. #Destiny2

2/5

Originally GLs had direct:explosion damage ratio changes based on Blast Radius stat but total damage was the same. Why this happens was a mystery, but reading replies it seems v7.3.6 buffed Special GL direct hits by +40%, causing total damage to vary (unclear if bug).

3/5

In principle, the same rule should apply to all Special GLs, but reportedly the difference isn't as large on weapons other than Mountaintop.

4/5

This was also reported elsewhere, but it was puzzling since Special GL mechanics shouldn't have allowed this. Now that I understand the reason, it makes sense.

5/5

This means if your MW is Blast Radius, for single-target damage you're better off NOT leveling the MW (keeping Blast Radius stat low).

Sunbracers Healing Technique

1/4

Technique to easily proc Sunbracers while maintaining healing as Warlock. [Summary] Use Scorch stacking + fire kill buff extension fragments. Heat Rises → Jump snap → Phoenix Dive immediately → Ignition kill → Sunbracers. Maintain Radiant 12s & Restoration x2 12s & Heat Rises 30s. Restoration x2 is stronger than Healing Rift. #Destiny2

2/4

Eso also uses this technique extensively in solo master dungeon clears.

3/4

Addendum: Sunbracers shows "...Ready" for 5 seconds after activation, and using your first grenade during this resets the counter, starting a fresh 5 second infinite grenade period. So if you want to use one grenade for slow-activating Heat Rises, use it during the first 5s and you'll still have plenty of grenades for attacks after.

4/4

I've also uploaded the same video from the tweet to YouTube.

Kinetic Tremors Comparison

1/2

Updated Kinetic Tremors comparison table. New SMG Show Runner tops the fastest activation ranking at 0.73 seconds. Why did they put Kinetic Tremors on such high RPM with only 12 hits required? Makes pistols etc. obsolete...

2/2

Unlike previous table, this one starts timing from first hit, so all activation times are slightly shorter - but this is more conventional. My prediction of "rapid-fire pulse with Kinetic Tremors would be strong" was completely surpassed by high-RPM SMG getting it.

Target Lock Mechanic Explained

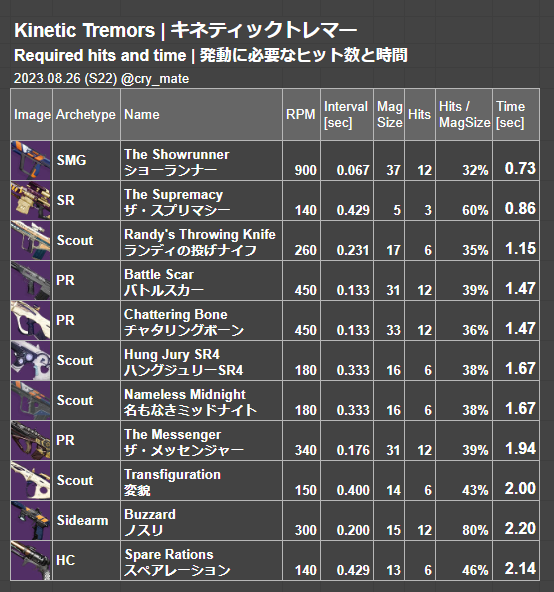
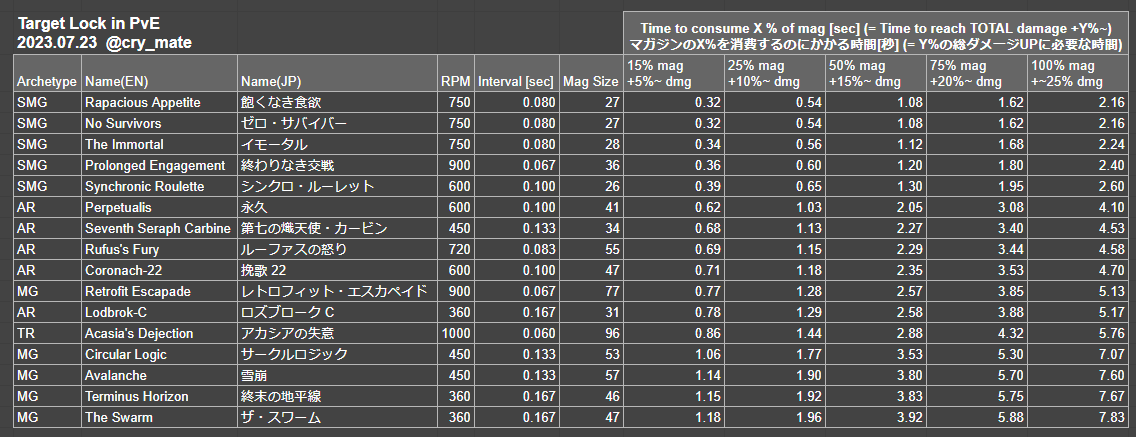
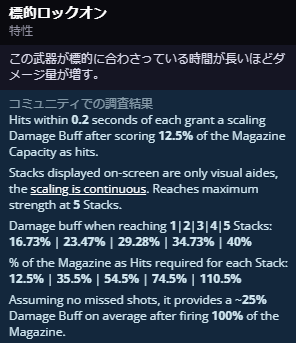
1/7

"Target Lock" buff stacks based on % of magazine consecutively hit. Smaller mag + higher RPM = faster high buff. Sorted by fastest high effect. In PvE, hitting entire mag gives ~25% cumulative damage increase.

2/7

For 750 RPM SMGs, ranking differences are just 1 round of mag size, so same weapon with different 2nd column perk (Magazine) can easily change position. AR's Perpetual has surprisingly high effectiveness. Meanwhile Rufus, despite high RPM, has very large mag so effect builds slowly.

3/7

Roz Broke is low RPM so effect builds slowly, but consider its high range. Target Lock by design is less effective against weak enemies, so in PvE you'd use it in hard content. Dying from getting close with short-range weapons defeats the purpose.

4/7

One use of this table is comparing to other damage perks. For example, Frenzy is +15% damage, but Rufus Target Lock needs 2.29 seconds of continuous hits for +15% cumulative damage. Whether you can fight like that is one decision criterion.

5/7

This week's NF reward The Swarm: Target Lock hits +10% cumulative at 1.96 seconds, matching Heavy Vorpal's +10%. If you're swapping to shoot after stunning Overload Champions (stun is ~5.5s), Target Lock probably has higher DPS.

6/7

Retrofit stands out among LMGs. No setup required, 5.13 seconds to empty mag into tough enemy for +25% cumulative damage. Enhanced version is slightly stronger at ~28% for full mag.

7/7

This table only shows how fast PvE Target Lock effect builds, not weapon strength ranking. Cumulative damage increase is hard to grasp for this perk, so hopefully this helps when choosing best perk considering weapon stats, skill level, and situation.